Adding a recipient
If you have rights to use the Manage Recipients feature, you can use the Recipient Management page to add a recipient.
In ACH transactions, the ACH Name in the Add Recipient page can be up to 22 characters long. In wire transactions, the wire name limit is 35 characters long. Both names can include letters and numbers. The wire name is required only when the recipient record contains a wire account.
To add a recipient
- In the navigation , click or tap Commercial > Recipients. The Recipient Management page appears.
- On the Recipient Management page, click or tap Add Recipient. The Add Recipient page appears.
- On the Recipient Detail tab, do the following:
- Enter the Display Name. The display name appears in online and mobile banking to help you recognize the recipient.
- Enter the ACH Name, then the ACH ID.
Note: You can also enter a Wire Name, depending on how you plan to utilize this recipient.
Note: Categorizing the Recipient will filter the Recipients that are displayed when Users are creating ACH transactions when the SEC code is selected in the Payment/Template workflow.
- (Optional) Enter the E-Mail Address. If you enter an email address, we can notify the recipient when a transaction processes.
- From the Country drop-down list, select the country. The address fields change based on the country selection.
- Enter the postal address information.
- Click or tap Next. The Account – New tab appears.
- Click or tap one of the following Payment Types Allowed:
- ACH Only
- ACH and Wire Only
- Wire Only
- Click or tap one of the following Beneficiary Types:
- Domestic
- International
- (Optional) If the Beneficiary Type is International, click or tap one of the following International Account Types:
- IBAN
- SWIFT/BIC
- IBAN & SWIFT/BIC
- In the Account Detail area, do the following:
- Click or tap the account type in the Account Type field.
- Enter the account number in the Account field.
- (Optional, for Corporate users only) Enter the FI name or FI routing number. As you type, relevant results will appear in a drop-down list from which you can select the appropriate value. After you select a value, several fields will populate with values automatically, depending on the payment type.
Note: The ACH Routing Number and Wire Routing Number may differ for a single FI, especially if the FI has made several acquisitions and/or mergers.
- (Optional) For the ACH and ACH and Wire payment types, enter the routing number in the ACH Routing Number field. You must enter a valid routing number.
- (Optional) If you plan to use the account with wire transfers, do the following in the Beneficiary FI area:
- Enter the Name.
- From the Country drop-down list, select the country. The address fields change based on the country selection.
- If the country is the United States, enter the Wire Routing Number. If the country is not the United States, enter the IBAN or SWIFT/BIC numbers.
- Enter the postal address information.
- (Optional) If you plan to use the account with wire transfers and the beneficiary FI requires an intermediary FI, do the following in the Intermediary FI area:
- Enter the Name.
- From the Country drop-down list, select the country. The address fields change based on the country selection.
- If the country is the United States, enter the Wire Routing Number. If the country is not the United States, enter the IBAN or SWIFT/BIC numbers.
- Enter the postal address information.
- Click or tap Save Recipient. The new recipient appears in the Recipient Management page.
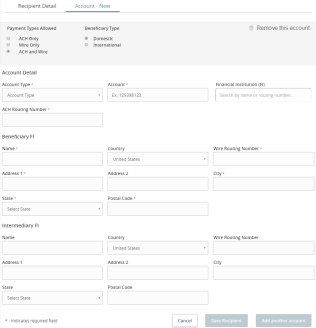
Note: The Account-New tab may or may not have a routing number, depending on the user.
Tip: Repeat steps 4 through 9 to add additional associated accounts to the recipient.