Budget
The Budget tool allows you to set budgets for each spending category and track spending in these categories each month. As each month progresses, this tool provides visual clues to show you how close you are to hitting the assigned thresholds.
The first time you use the Budget tool, you have the option to Create My Own Budgets or choose to Auto-Generate Budgets based on your spending history.
If you choose Create My Own Budgets, a menu of categories appears. Choose a category, then set the budget amount.
If you choose Auto-Generate Budgets, a set of bubbles appear that display suggested categories and amounts based on your spending history.
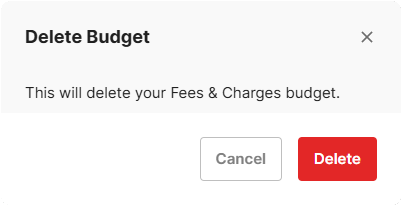
If you do not want a specific budget tracked, select Delete, then
select Delete again. Select the back arrow ![]() to return to the Budget tool dashboard.
to return to the Budget tool dashboard.
-
In the Budget tool, select Add Budget
(
 ).
).
-
Select a category from the budget categories available.
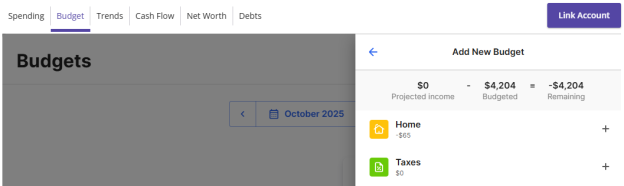
- Enter an amount in the Budget Amount field. Select Save or Cancel.
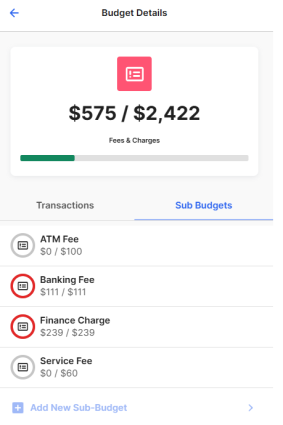
- In the Budget tool, select the budget category for which you want to add a sub-budget.
- Select the Sub Budgets tab.
- Select Add New Sub-Budget.
-
Select the desired category.
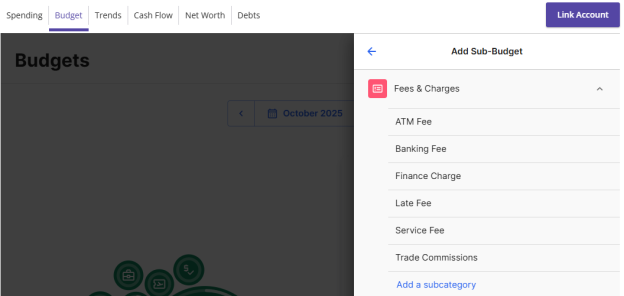
- Enter an amount in the Budget amount field. Select Save.
- (Optional) To create a custom sub-category, select Add a subcategory.
- Enter the name of the sub-category you want to create and select Confirm or press Enter.
- Select a category to display a list of sub-budgets, along with your monthly progress.
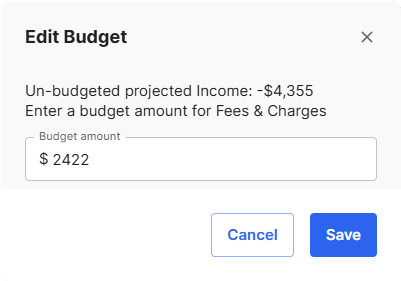
- Select Edit to edit the budgeted amount and
select Save.
- Select Delete to delete the budget, and then
select Delete.
- Select a budget and
select Transactions to display a list of all
transactions within the related category. Here, you can access transaction details and
re-categorize transactions.
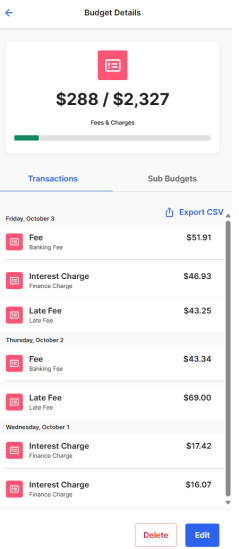
- Select an individual transaction to view and edit
the transaction details.
Note: Tags only appear within Financial Tools. They do not appear on the Account Details page and are not used for anything within digital banking at this time.
- In the Budget tool, select a bubble budget.
- Select Transactions to see transactions for the relevant month. All individual transactions for the selected month appear.
- Select an individual transaction to view the transaction details.
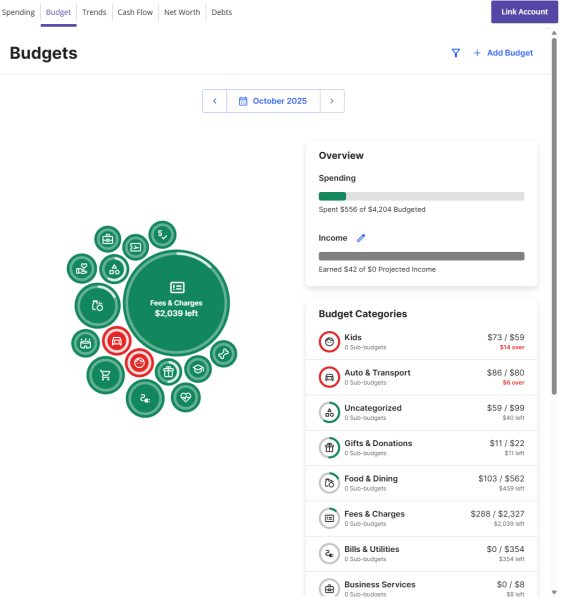
After your budgets are created, they appear in the bubble form. The color of the bubbles represents the amount of your budget spent. Bubbles can appear as the following colors:
- Green—less than 80% of the budget spent.
- Yellow—between 80% and 100% of the budget spent.
- Red—more than 100% of the budget spent.
The size of the bubble is relative to the amount, and exact progress displays on the outside rim of the bubble. You can drag and drop bubbles.
Projected income is calculated based on transaction history or, if your income is not automatically identified, you can select a repeating transaction and customize a payment schedule. You can view and edit the projected income for each budget category.
-
In the Budget tool, selectEdit
(
 )
next to Income.
)
next to Income.
-
Select Add Income
().
- Select a category to add as it an income source.
- Enter the payment schedule details, then select Save.
Select a budget category bubble and select Transactions to view transactions within the budget category. Select Edit to modify the budget amount or to delete the budget. Select Sub Budgets to display its current sub-budgets, if available.
Select Delete to delete the budget or select Edit to edit the amount.
The right Overview panel will always display your budget in list form. The color of the icons represents the amount of your budget spent. The icons appear as the following colors:
- Green—less than 80% of the budget spent.
- Yellow—between 80% and 100% of the budget spent.
- Red—more than 100% of the budget spent.
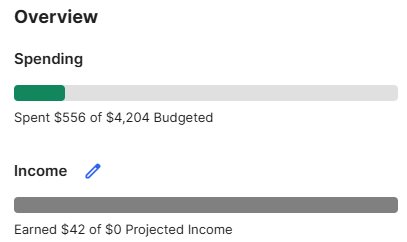
The Spending bar displays monthly progress for the sum of all budgets.
- In the Budget tool, select Add Budget.
- Choose the transaction tags you want to include in your new budget and select Next.
- Enter a name and monthly limit for the budget and select Next.
- Choose the account(s) you want the budget to apply to.
- Select Finish.
After your budgets are created, your budget categories appear in a graph view that displays the amount you have left in each category.
- In the Budget tool, select a budget category.
- Select Edit Budget.
- Edit the Budget Info, Available Tags, and Accounts as desired.
- Select Save to save your changes or Delete to remove the budget.
- In the Budget tool, select a budget category.
- Select the transaction you want to edit from the list below the graph.
- To edit the category name, select the category name and choose a new category from the associated dropdown .
- To edit the transaction name, select the Name field and enter a new name.
- To split the transaction into two categories, select the Split Transaction button, add additional tags, and select Save.